 openlayers实现角度测量
# 概述
在前面介绍了如何在 Openlayers 中进行长度和面积的测量,可以参考:《Openlayers 实现长度测量》 (opens new window),《openlayers 实现面积测量》 (opens new window)。
那么如何在 Openlayers 中进行角度的测量呢?很遗憾ol/sphere模块中没有提供对应角度测量的 API 或方法,但是我们可以自己实现。
# 实践
# 效果展示
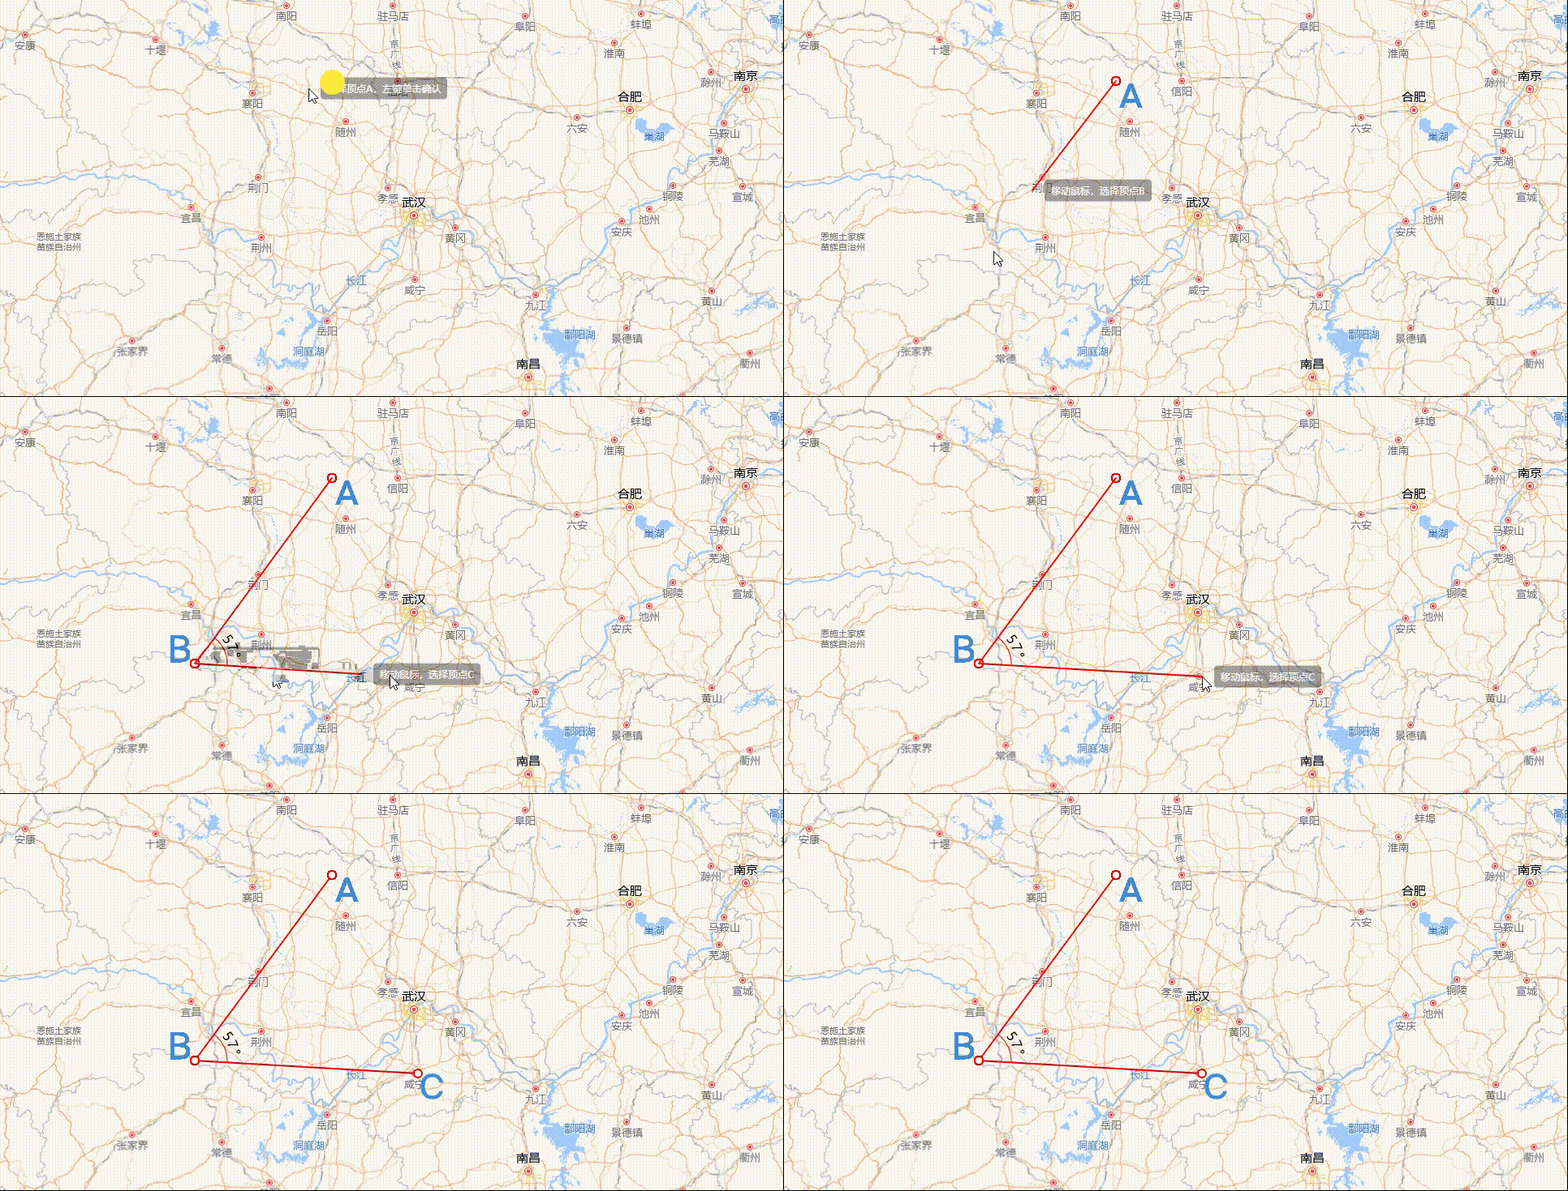
角度量测绘制 
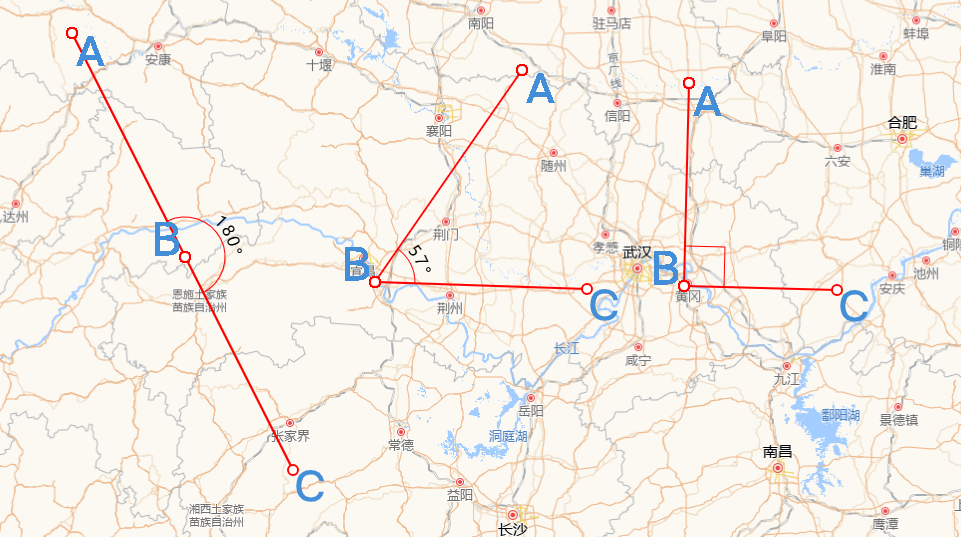
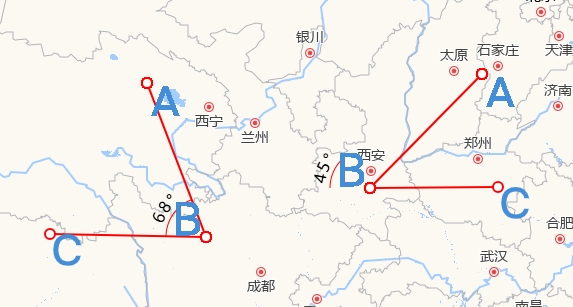
结果 
# 实现思路
实现思路主要有两点:一是计算夹角的度数;二则是夹角的圆弧表示,上图中表示角度的圆弧,可以是 0 - 180° 中的任意一个角度,且它总是包裹在夹角内,连接夹角的两边。
# 夹角的度数计算
- 确定夹角
数学常识可知,夹角度数的区间必定是[0°,180°],而且,夹角是由三个坐标点的位置确定大小的,如上图中的顶点A、B、C。因此,我们可以内定顶点 ∠ABC是我们需要测量的夹角。
- 确定顶点坐标位置
可以在地图上随机取三个点作为顶点,但是这样并不科学,这样无法满足绘制特定角度的需求。选点还是通过ol/interaction模块的Draw API 进行拾取。
但geom.getCoordinates()返回的坐标个数达到四个时,就调用this.draw.finishDrawing()方法结束绘制。因为它的返回值倒数的两个坐标都是一样的,因此即使我们只需要三个点的坐标,也需要等到它的返回值长度是4。
实现代码如下:
this.draw.on(
  "drawstart",
  (evt: { feature: Feature<Geometry>, coordinate: Coordinate }) => {
    const { feature, coordinate } = evt;

    this.listenGeometryChange = feature.getGeometry().on("change", (evt) => {
      const geom = evt.target;

      let startPoint = geom.getFirstCoordinate();

      this.addMarker({ coordinate: startPoint, symbolId: "A", anchor: [0, 0] });

      const coordinates = geom.getCoordinates().slice(0, -1);

      if (coordinates.length > 1) {
        this.addMarker({
          coordinate: coordinates[1],
          symbolId: "B",
          anchor: [1, 1],
        });
      }
      const pointscount = geom.getCoordinates();
      if (pointscount.length >= 4) {
        this.addMarker({
          coordinate: coordinates[2],
          symbolId: "C",
          anchor: [0, 0],
        });
        this.addAngleMark({
          coordinate: coordinates[1],
          Angles: calculateAngle(coordinates),
        });
        this.draw.finishDrawing();
      }
    });
  }
);
2
3
4
5
6
7
8
9
10
11
12
13
14
15
16
17
18
19
20
21
22
23
24
25
26
27
28
29
30
31
32
33
34
35
36
37
- 如何计算夹角
两点的坐标位置决定了两点之间的距离,即当我们知道A、B和C的坐标后,就可以知道线段AB和BC的长度了,然后通过数据计算就可以知道 ∠ABC的大小了。前面提到夹角的区间范围,因为在电脑中,夹角也可以是负值,这个取决于它对应的方向是顺时针还是逆时针方向,因此要保证夹角的范围在区间[0°,180°]内。
封装的计算夹角的方法calculateAngle如下:
const calculateAngle = (points: Coordinate[]) => {
  // 提取坐标点 A, B, C
  const [A, B, C] = points;

  // 计算向量 AB 和 BC
  const AB = { x: B[0] - A[0], y: B[1] - A[1] };
  const BC = { x: C[0] - B[0], y: C[1] - B[1] };

  // 计算点积
  const dotProduct = AB.x * BC.x + AB.y * BC.y;

  // 计算向量的模
  const magnitudeAB = Math.sqrt(AB.x ** 2 + AB.y ** 2);
  const magnitudeBC = Math.sqrt(BC.x ** 2 + BC.y ** 2);

  // 计算余弦值
  const cosTheta = dotProduct / (magnitudeAB * magnitudeBC);

  // 确保 cosTheta 在 -1 和 1 之间
  const clippedCosTheta = Math.max(-1, Math.min(1, cosTheta));

  // 计算夹角(弧度转换为度)
  const angleInRadians = Math.acos(clippedCosTheta);
  const angleInDegrees = angleInRadians * (180 / Math.PI);

  // 计算方向(使用叉积)
  const crossProduct = AB.x * BC.y - AB.y * BC.x;

  // 如果叉积为负
  const angle = crossProduct < 0 ? angleInDegrees - 180 : 180 - angleInDegrees;

  return angle;
};
2
3
4
5
6
7
8
9
10
11
12
13
14
15
16
17
18
19
20
21
22
23
24
25
26
27
28
29
30
31
32
33
# 夹角的圆弧
通过上面可以计算得到 ∠ABC夹角的度数了,因为是自由绘制选点,因此无法保证BA或者BC是否与水平方向平行一致。小学时代,用量角器测量时,第一步就是需要保证量角器的底边与夹角的一边对齐,这样的测量结果才准确。但是在 Openlayers 中,我们就是需要去实现这样一个量角器,无论在地图上选择哪三个顶点,圆弧都能准确表示角度。并且这个圆弧的长度不固定。
这个需求可以使用canvas或者svg实现,例子中是使用svg实现的。
- svg 画一个圆弧
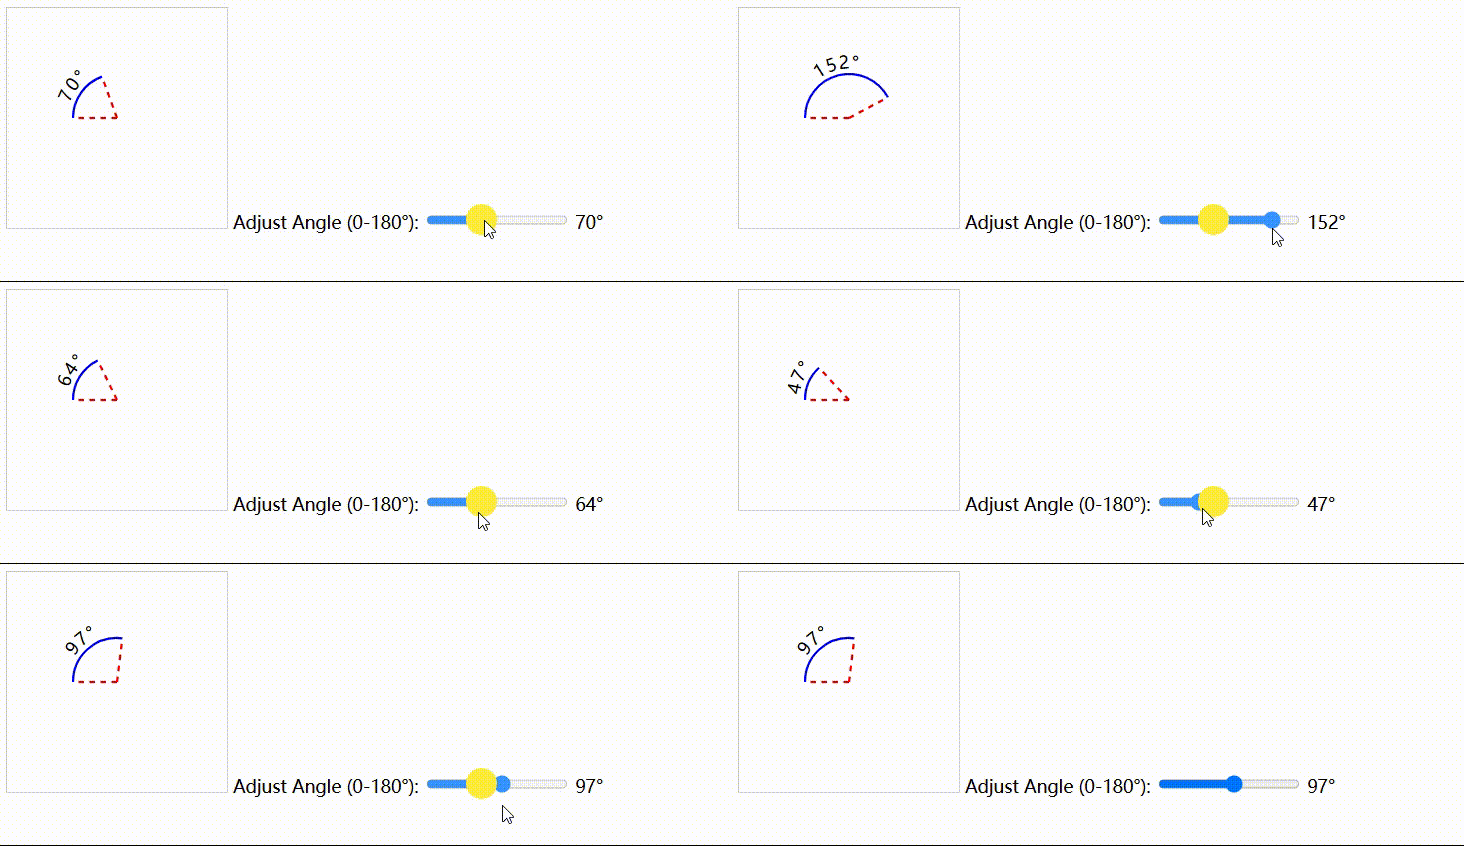
效果如下:

拖动滑块,可以动态绘制任意一段圆弧,其代码如下:
<svg width="200" height="200">
  <path id="arc" fill="none" stroke="blue" stroke-width="2" />
  <line
    id="radial1"
    x1="100"
    y1="100"
    stroke="red"
    stroke-width="2"
    stroke-dasharray="5,5"
  />
  <line
    id="radial2"
    x1="100"
    y1="100"
    stroke="red"
    stroke-width="2"
    stroke-dasharray="5,5"
  />
  <text fill="black" font-size="16" text-anchor="middle">
    <textPath href="#arc" startOffset="50%" side="left">
      <tspan dy="-5" id="text"></tspan>
    </textPath>
  </text>
</svg>
2
3
4
5
6
7
8
9
10
11
12
13
14
15
16
17
18
19
20
21
22
23
24
function drawArc(adjustedAngle) {
  const endY = centerY + radius * Math.cos((adjustedAngle * Math.PI) / 180);
  const endX = centerX - radius * Math.sin((adjustedAngle * Math.PI) / 180);
  const startY = centerX;
  const startX = centerY - radius;

  const largeArcFlag = adjustedAngle > 180 ? 0 : 1;

  const d_1 = `M ${startX} ${startY} A ${radius} ${radius} 0 ${largeArcFlag} 1 ${endX} ${endY}`; //表示非直角

  const d_2 = `M ${endX} ${endY} L ${startX} ${endY}  L${startX} ${startY}`; //表示直角
  const angle = Math.abs(adjustedAngle);

  let lastD = d_1;
  if (angle == 540) {
    lastD = d_2;
  }
  arcPath.setAttribute("d", lastD);

  radial1.setAttribute("x2", startX);
  radial1.setAttribute("y2", startY);
  radial2.setAttribute("x2", endX);
  radial2.setAttribute("y2", endY);
}
2
3
4
5
6
7
8
9
10
11
12
13
14
15
16
17
18
19
20
21
22
23
24
- 圆弧贴图
现在需要将圆弧以Overlay的方式添加到 ∠ABC处就完事了,结果如下:

上面的情形就很诡异,因为圆弧始终是在水平位置,而我们选点是随意的,因此圆弧需要旋转一定的角度,使得圆弧的两边与夹角的两边对齐。但是具体旋转多少角度,逆时针旋转还是顺时针旋转?这个就取决于线段BA与BC的倾斜角度,准确来说是以顶点B为原点建立坐标系,水平方向为X轴且向右为X轴正半轴,垂直方向为Y轴且向上为Y轴正半轴。那么圆弧的旋转角度和方向就取决于BA和BC与X 轴负半轴的夹角。
和 CSS 中transform的rotate规则报纸一致,规定圆弧逆时针旋转为负,顺时针旋转为正。因此,我们可以规定如果BA(或者BC)在第三象限或者是第四象限,则它与X轴负半轴的夹角为负值;反之,如果在第一象限则为正数钝角,第二象限则为正数锐角
- 计算 BA 或者 BC 与 X 轴负半轴夹角 主要还是用到数学知识,代码如下:
function calculateAnglePoint(points) {
  const [A, B, C] = points;
  const [Ax, Ay] = A;
  const [Bx, By] = B;
  const [Cx, Cy] = C;

  // 计算向量 BA 和 BC
  const BA = { x: Ax - Bx, y: Ay - By }; // BA 向量(从 B 到 A)
  const BC = { x: Cx - Bx, y: Cy - By }; // BC 向量(从 B 到 C)

  // 计算 BA 和 BC 向量与 X 轴的夹角(单位:度)
  let angleBA = Math.atan2(BA.y, BA.x) * (180 / Math.PI); // [-180, 180] 范围
  let angleBC = Math.atan2(BC.y, BC.x) * (180 / Math.PI); // [-180, 180] 范围

  // 计算 BA 向量与 X 轴负半轴的夹角
  if (angleBA >= 0 && angleBA < 90) {
    // 第一象限,夹角为正钝角
    angleBA = 180 - angleBA;
  } else if (angleBA >= 90 && angleBA <= 180) {
    // 第二象限,夹角为正锐角
    angleBA = 180 - angleBA;
  } else if (angleBA < 0 && angleBA >= -90) {
    // 第四象限,夹角为负钝角
    angleBA = Math.abs(angleBA) - 180;
  } else {
    // 第三象限,夹角为负锐角
    angleBA = Math.abs(angleBA) - 180;
  }

  // 计算 BC 向量与 X 轴负半轴的夹角
  if (angleBC >= 0 && angleBC < 90) {
    // 第一象限,夹角为正钝角
    angleBC = 180 - angleBC;
  } else if (angleBC >= 90 && angleBC <= 180) {
    // 第二象限,夹角为正锐角
    angleBC = 180 - angleBC;
  } else if (angleBC < 0 && angleBC >= -90) {
    // 第四象限,夹角为负钝角
    angleBC = Math.abs(angleBC) - 180;
  } else {
    // 第三象限,夹角为负锐角
    angleBC = Math.abs(angleBC) - 180;
  }

  return {
    angleBA: angleBA, // BA 向量与 X 轴负半轴的夹角
    angleBC: angleBC, // BC 向量与 X 轴负半轴的夹角
  };
}
2
3
4
5
6
7
8
9
10
11
12
13
14
15
16
17
18
19
20
21
22
23
24
25
26
27
28
29
30
31
32
33
34
35
36
37
38
39
40
41
42
43
44
45
46
47
48
49
- 确定旋转角度
由上得到了angleBA和angleBC,毫无疑问,如果BA和BC在第一二象限,则圆弧需要顺时针旋转,且旋转角度为Math.min(angleBA,angleBC),反之都在第三四象限,则旋转角度为- Math.max(Math.abs(angleBa),Math.abs(angleBC)),如果BA和BC在不同象限,那就要分情况讨论了,具体判断规则如下:
let rotate = 0;
if (angleBA < 0 && angleBC < 0) {
  rotate = -Math.max(Math.abs(angleBA), Math.abs(angleBC));
}
if (angleBA > 0 && angleBC > 0) {
  rotate = Math.min(Math.abs(angleBA), Math.abs(angleBC));
}

//第一二三象限 不同象限

if (angleBA >= 135 && angleBA <= 180 && angleBC <= -45 && angleBC >= -90) {
  rotate = angleBA;
}
if (angleBC >= 135 && angleBC <= 180 && angleBA <= -45 && angleBA >= -90) {
  rotate = angleBC;
}

if (angleBA >= 135 && angleBA <= 180 && angleBC <= 0 && angleBC >= -45) {
  rotate = angleBC;
}
if (angleBC >= 135 && angleBC <= 180 && angleBA <= 0 && angleBA >= -45) {
  rotate = angleBA;
}

if (angleBA >= 90 && angleBA <= 135 && angleBC <= 0 && angleBC >= -45) {
  rotate = angleBC;
}
if (angleBC >= 90 && angleBC <= 135 && angleBA <= 0 && angleBA >= -45) {
  rotate = angleBA;
}
if (angleBA >= 90 && angleBA <= 135 && angleBC >= -90 && angleBC <= -45) {
  rotate = angleBA;
}

if (angleBC >= 90 && angleBC <= 135 && angleBA >= -90 && angleBA <= -45) {
  rotate = angleBC;
}

if (angleBA >= 0 && angleBA <= 90 && angleBC <= 0 && angleBC >= -90) {
  rotate = angleBC;
}

if (angleBC >= 0 && angleBC <= 90 && angleBA <= 0 && angleBA >= -90) {
  rotate = angleBA;
}

//第一二四象限不同象限
if (angleBC >= -180 && angleBC <= -90 && angleBA <= 180 && angleBA >= 90) {
  rotate = angleBA;
}

if (angleBA >= -180 && angleBA <= -90 && angleBC <= 180 && angleBC >= 90) {
  rotate = angleBC;
}

if (angleBC >= -135 && angleBC <= -90 && angleBA >= 0 && angleBA <= 45) {
  rotate = angleBC;
}

if (angleBC >= -135 && angleBC <= -90 && angleBA >= 45 && angleBA <= 90) {
  rotate = angleBA;
}

if (angleBA >= -135 && angleBA <= -90 && angleBC >= 0 && angleBC <= 45) {
  rotate = angleBA;
}

if (angleBA >= -135 && angleBA <= -90 && angleBC >= 45 && angleBC <= 90) {
  rotate = angleBC;
}

if (angleBC >= -180 && angleBC <= -135 && angleBA >= 0 && angleBA <= 45) {
  rotate = angleBC;
}

if (angleBC >= -180 && angleBC <= -135 && angleBA >= 45 && angleBA <= 90) {
  rotate = angleBA;
}

if (angleBA >= -180 && angleBA <= -135 && angleBC >= 0 && angleBC <= 45) {
  rotate = angleBA;
}
if (angleBA >= -180 && angleBA <= -135 && angleBC >= 45 && angleBC <= 90) {
  rotate = angleBC;
}
2
3
4
5
6
7
8
9
10
11
12
13
14
15
16
17
18
19
20
21
22
23
24
25
26
27
28
29
30
31
32
33
34
35
36
37
38
39
40
41
42
43
44
45
46
47
48
49
50
51
52
53
54
55
56
57
58
59
60
61
62
63
64
65
66
67
68
69
70
71
72
73
74
75
76
77
78
79
80
81
82
83
84
85
# 总结
在 Openlayers 中测量角度主要还是要用到一些数据的基础知识,重难点就是圆弧的旋转表示,理解基本原理后发现也就那么一回事。
